
Investing in high-quality hair extensions is an exciting step towards achieving the voluminous, #longhair of your dreams. However, to keep them looking luscious, vibrant, and tangle-free, you need to master a crucial skill: how to properly wash and condition them. Unlike your natural hair, extensions don’t receive the scalp’s natural oils, making them more prone to dryness and damage if not cared for correctly. This comprehensive guide will walk you through the entire process, from pre-wash prep to post-wash drying. Following these expert hair care tips will protect your investment, extend the life of your extensions, and ensure they blend seamlessly with your natural locks for a flawless finish every time.
Why Proper Hair Extension Care is Non-Negotiable
Before we dive into the “how,” let’s understand the “why.” Proper hair extension care isn’t just a suggestion; it’s a requirement for longevity and appearance. Incorrect washing techniques can lead to a host of problems, including severe tangling, matting at the base, dryness, breakage, and even damage to the bonds or wefts. By dedicating a little time to a gentle and effective washing routine, you prevent product buildup, restore moisture, and maintain the silky-smooth texture that made you fall in love with them in the first place. This is the foundation of all good #hairextension maintenance.
Pre-Wash Prep: The Foundation of a Flawless Wash
Success starts before a single drop of water touches the hair. Taking a few minutes to prepare your extensions will make the washing process smoother and prevent frustrating tangles later on. Think of it as setting the stage for a perfect performance.
Step 1: Detangle, Detangle, Detangle
This is arguably the most critical pre-wash step. Never wash tangled hair extensions, as water can make knots tighten and become nearly impossible to remove. Start at the tips of the hair and work your way up to the roots (or the weft/bonds). Use a wide-tooth comb or a specialized extension brush to gently remove any knots. Hold the hair firmly at the base while you brush to prevent pulling or putting stress on the attachment points. This gentle approach is a cornerstone of good hair care.
Step 2: Gather Your Supplies
Having everything you need within arm’s reach will streamline the process. You don’t need a salon’s worth of products, just the right ones. Here’s your checklist:
- Sulfate-Free Shampoo: Sulfates are harsh detergents that can strip extensions of moisture, leaving them dry and brittle.
- Hydrating, Silicone-Free Conditioner: A quality conditioner is essential for restoring moisture and softness.
- A Wide-Tooth Comb: For detangling during and after the wash.
- A Sink or Basin: This gives you better control than washing in the shower.
- A Soft, Absorbent Towel (Microfiber is ideal): To gently remove excess water.
The Ultimate Step-by-Step Guide to Wash Hair Extensions
Now that you’re prepped and ready, it’s time to wash your hair extensions. Follow these steps carefully for a safe and effective clean. This method is suitable for clip-ins, tape-ins, and halos that have been removed for washing. For permanent extensions, the principles are the same, but you’ll perform these steps while they are installed, being extra careful around the bonds.
Step 1: Wet the Hair with Lukewarm Water
Hold the extensions at the weft or base and thoroughly wet them under lukewarm running water. Hot water can cause damage and strip color, while cold water is less effective at removing product buildup. Ensure the water flows down the hair shaft, from the base to the ends, to prevent tangling.

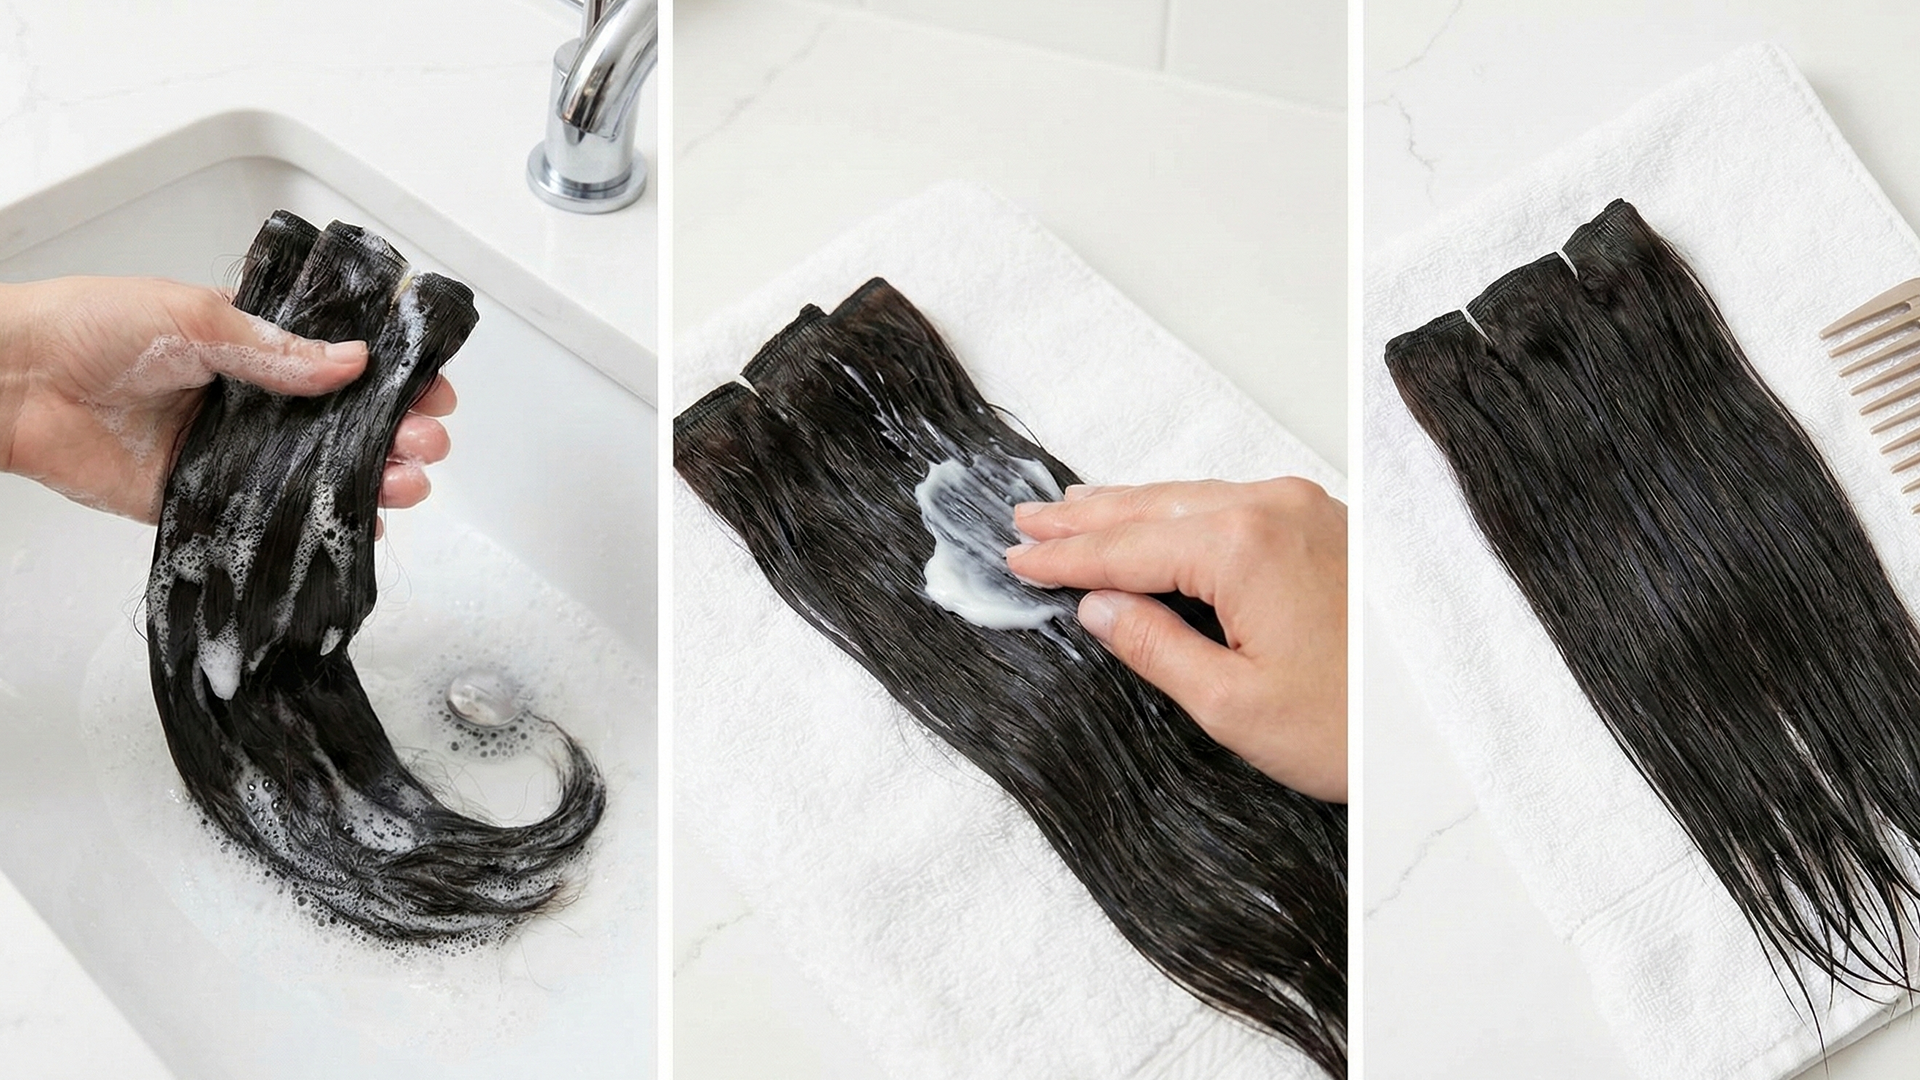
Step 2: Apply a Sulfate-Free Shampoo
Squeeze a small amount of sulfate-free shampoo into your palm and mix it with a little water to create a lather. Gently smooth the shampoo down the length of the hair extensions in a downward motion. Do not scrub, bunch, or rub the hair together in a circular motion, as this will cause major tangles. Focus on cleansing the hair without creating friction. For those who love their #extensionesdecabello, this gentle touch is key.
Step 3: Rinse Thoroughly
Rinse the shampoo out completely under the running lukewarm water, again ensuring the water flows from the top down. Any shampoo residue left behind can leave the extensions feeling heavy, dull, and greasy. Continue rinsing until the hair feels squeaky clean and no suds remain.
Step 4: Condition with Care
Gently squeeze out the excess water from the extensions. Apply a generous amount of hydrating conditioner, focusing on the mid-lengths and ends of the hair. This is where the hair is oldest and needs the most moisture. Crucially, avoid applying conditioner to the roots, wefts, or bonds (tape-in, keratin, etc.). Conditioner can cause these attachments to loosen, slip, or break down over time. Let the conditioner sit for 5-10 minutes for a deep moisturizing treatment.
Step 5: The Final Rinse
Rinse the conditioner out with cool water. The cooler temperature helps to seal the hair cuticle, which locks in moisture and adds a beautiful shine. Just like with the shampoo, ensure you rinse thoroughly until the hair no longer feels slippery. For more advanced hair care techniques, check out our post on [The Benefits of a Cold Rinse for Hair Health].
Post-Wash Perfection: Drying and Storing Your Extensions
How you handle your extensions after washing is just as important as the wash itself. Improper drying can undo all your hard work and lead to damage.
Step 1: Gently Squeeze, Don’t Rub
Once rinsed, gently squeeze the excess water out of the hair. Lay the extensions flat on a clean, dry towel. Roll the towel up with the extensions inside and press gently to absorb more water. Never, ever rub the extensions with a towel. The friction will cause frizz and tangles and can damage the hair cuticle.

Step 2: Air-Dry Whenever Possible
The best and safest way to dry your extensions is to let them air-dry. You can lay them flat on a towel or hang them up using a special extension hanger. If you’re in a hurry, you can use a blow dryer, but always apply a heat protectant spray first. Use the dryer on a low heat and low power setting, always pointing the nozzle downwards to keep the cuticles smooth. If you need help choosing a product, [Discover Our Top-Rated Heat Protectants].
Step 3: Store Properly
Once your extensions are completely dry, gently brush through them one last time. If you aren’t installing them right away, store them in a cool, dry place away from direct sunlight. An extension storage bag or the original box is ideal for keeping them protected and dust-free.
Conclusion: The Secret to Long-Lasting Extensions
Mastering how to wash hair extensions is the single most effective thing you can do to protect your investment and keep your hair looking flawless. By following this step-by-step tutorial—detangling before you start, using sulfate-free products, applying gentle downward motions, and drying with care—you provide the essential hair care your extensions need to thrive. A consistent and correct washing routine will reward you with soft, shiny, and beautiful #longhair that lasts for months or even years to come.
Actionable Takeaways
- Go Sulfate-Free: Always use sulfate-free shampoo and conditioner. This is the number one rule of hair extension care to prevent them from becoming dry, brittle, and dull.
- Downward Motion is Everything: During washing, rinsing, and drying, always work in a downward motion, from the base to the tips. This keeps the hair cuticles aligned, preventing tangles and frizz.